Traitements d'identités numériques
Fiabilisation, recherche et appariements jusqu'à 100 millions d'identités
Traitements d'identités numériques
Fiabilisation, recherche et appariements jusqu'à 100 millions d'identités
This is the first realistic use case, where we deal with more realistic data (encoding problems, more than 1M people datasets, …), were we’ll follow a more robust method for accurate matching.
WARNING: the global computing time of this tutorial is about 2h on a up-to-date laptop and 6h on our small tutorial server. You should consider to do first the simple tutorial which only takes about 10 minutes.
This is our first use case : we have to remove dead people, as registered in dataset deaths, from a client file clients.
We’ll follow four steps for use case 1.
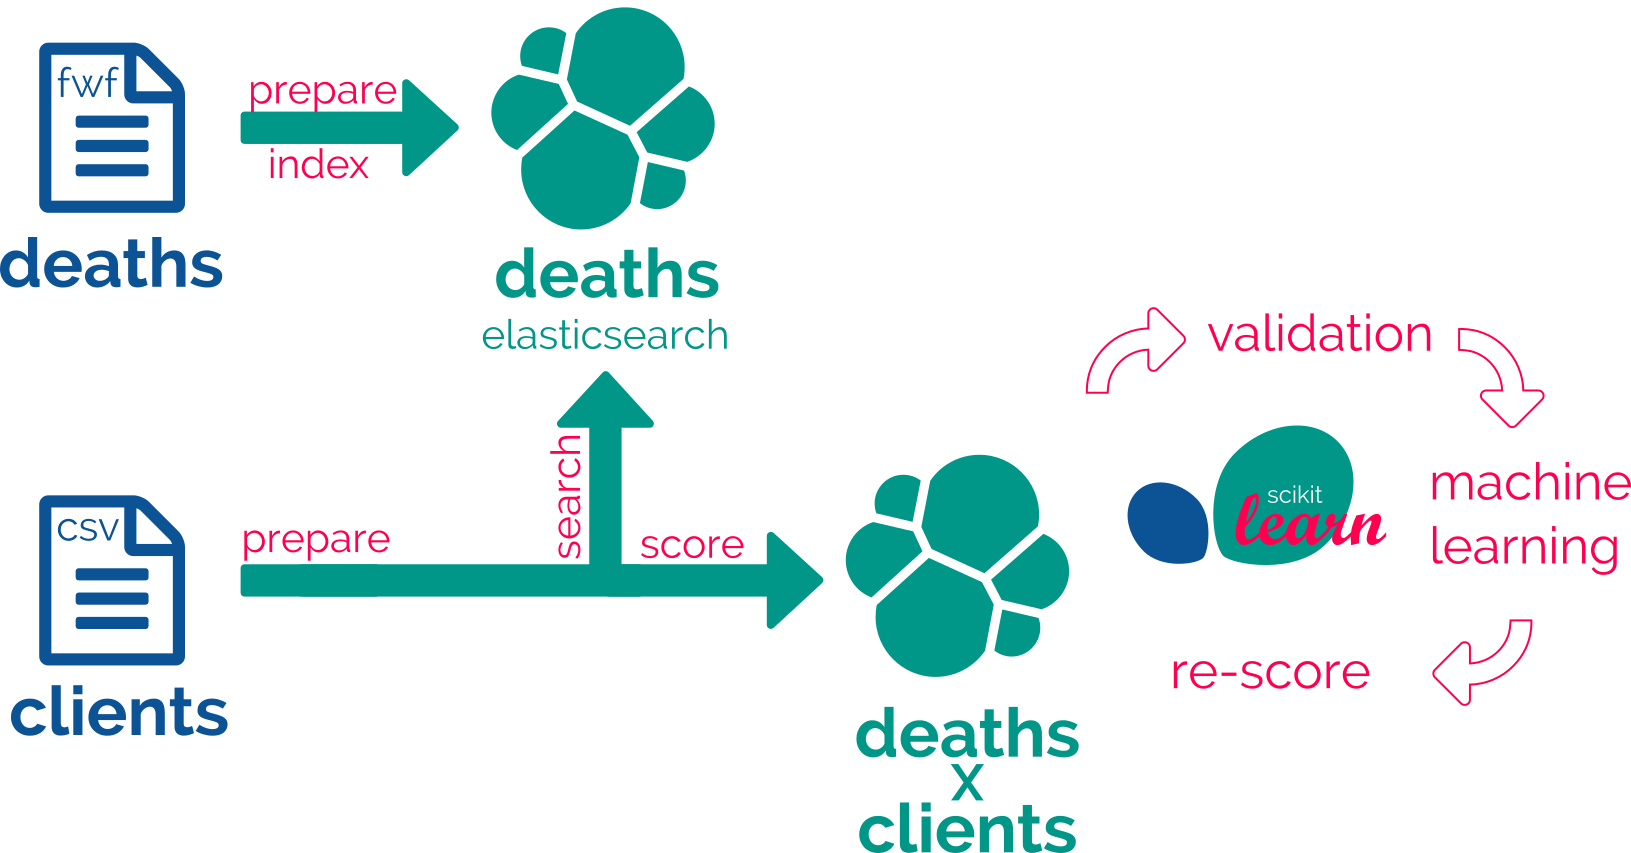
So, the final goal is the match but we have first to deal with the way, which mainly is data preparation. So we’ll learn here how to cook your data with recipes.
We propose a 4 or 5-step iteration method :
Iterating through these steps will allow you to create recipes and datasets for two purposes:
Three further steps will enable machine learning capabilities:
In the final round, matching a dataset of people, clients, against another already index-one, death will look like this recipe :
recipes:
  clients_deaths_matching:
    apply: True
    input: clients_csv
    output: clients_x_deaths
    steps:
      - dataprep_clients:
      - deaths_matching:
      - diff:
      - rescoring_clients_x_deaths:
This leads to a new API endpoint:
http://localhost:8081/matchID/api/v0/recipes/clients_deaths_matching/apply`.
This is where you’ll be able to post your new monthly csv raw data. Then you’ll get the json of ml-rescored candidates for removal.
Truth is this simple overview relies on more than 50 treatments or steps. To be able to use it, you’ll have to adapt it to your own use case.
These recipes applied to a “some-millions” death reference dataset, should gives about:
We suppose your matchID server is already started, as explained in starting matchID.
Now, you can go to your matchID server :
WARNING: your should’nt try the tutorial on the tutorial matchID site as it is a very slow computer (3x slower than your laptops vCPUs).

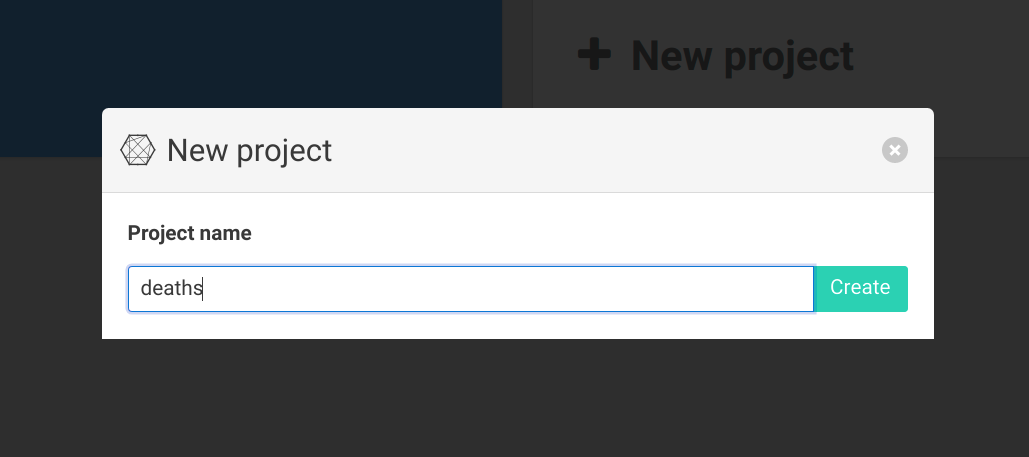
We’ll first have to create a project. This will basically be a folder, containing datasets and recipes (data transformation). A good segmentation is to build a project for each goal : use case 1 matches dead people within a client file, so we basically chose to have two projects: deaths, and clients. Just clic on new project and name the first one deaths:
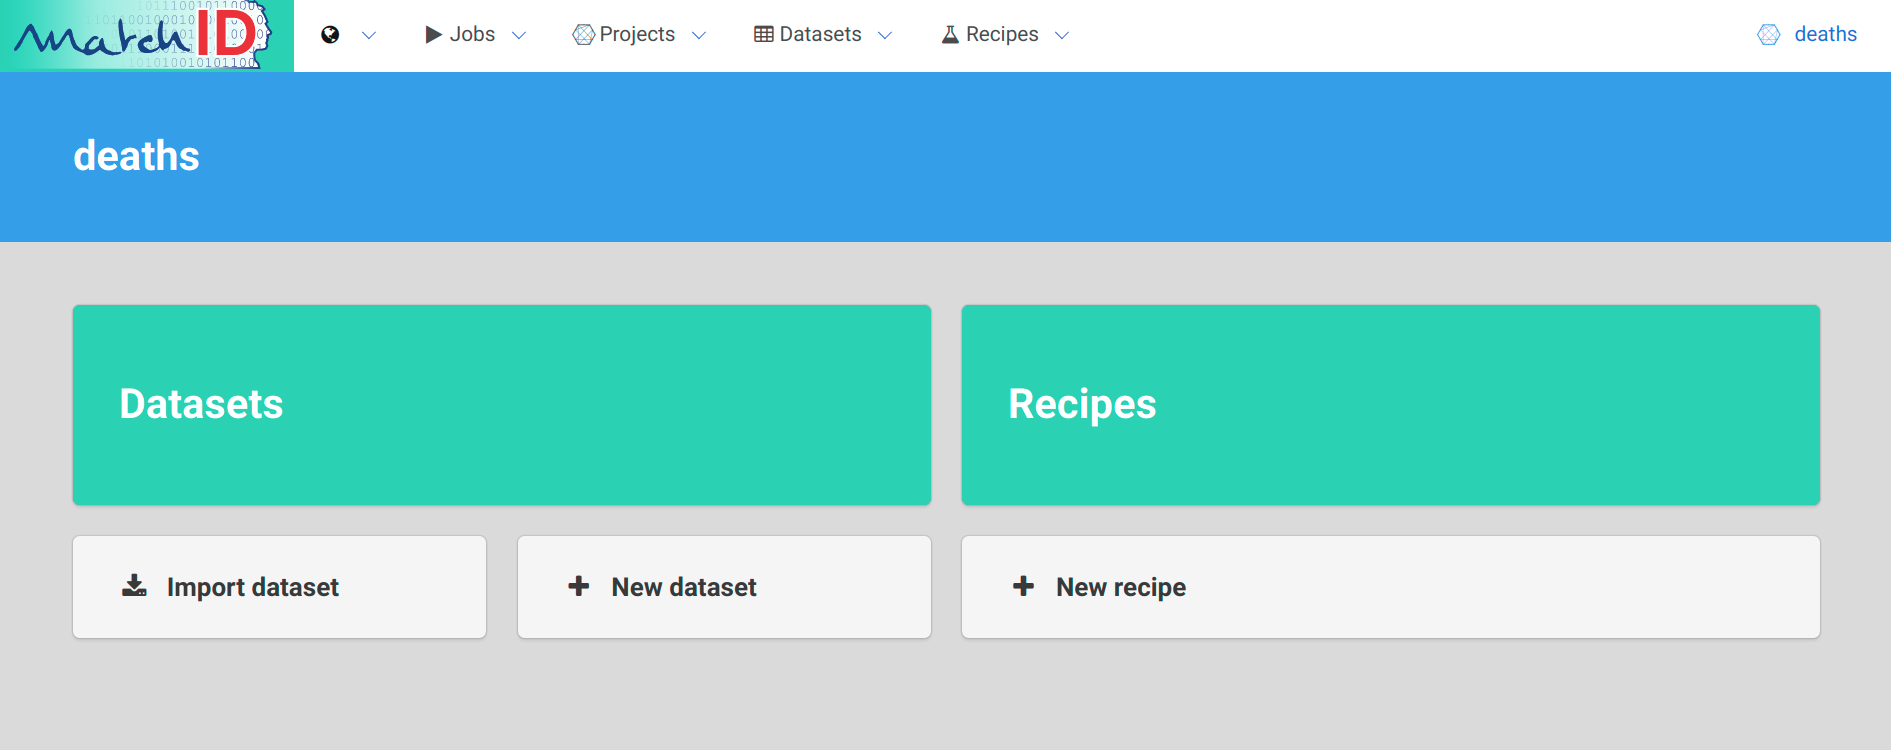
Which leads to:
*Note :
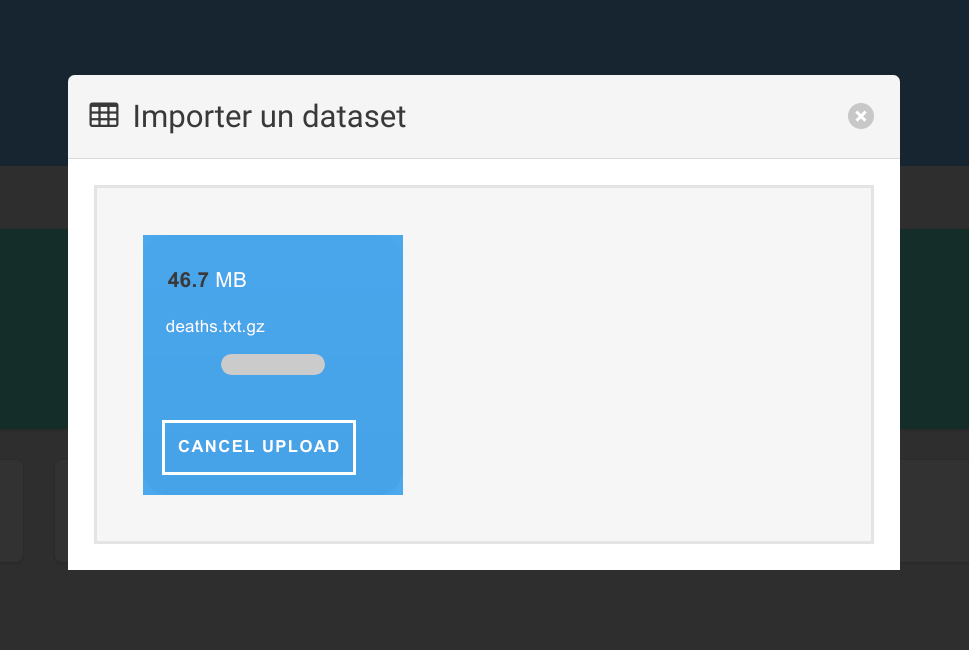
Click again on import dataset and just drag-n-drop (thx to Dropzone) the death.txt.gz downloaded from the examples matchID repo.
Now you have your first dataset:
We have many observations:
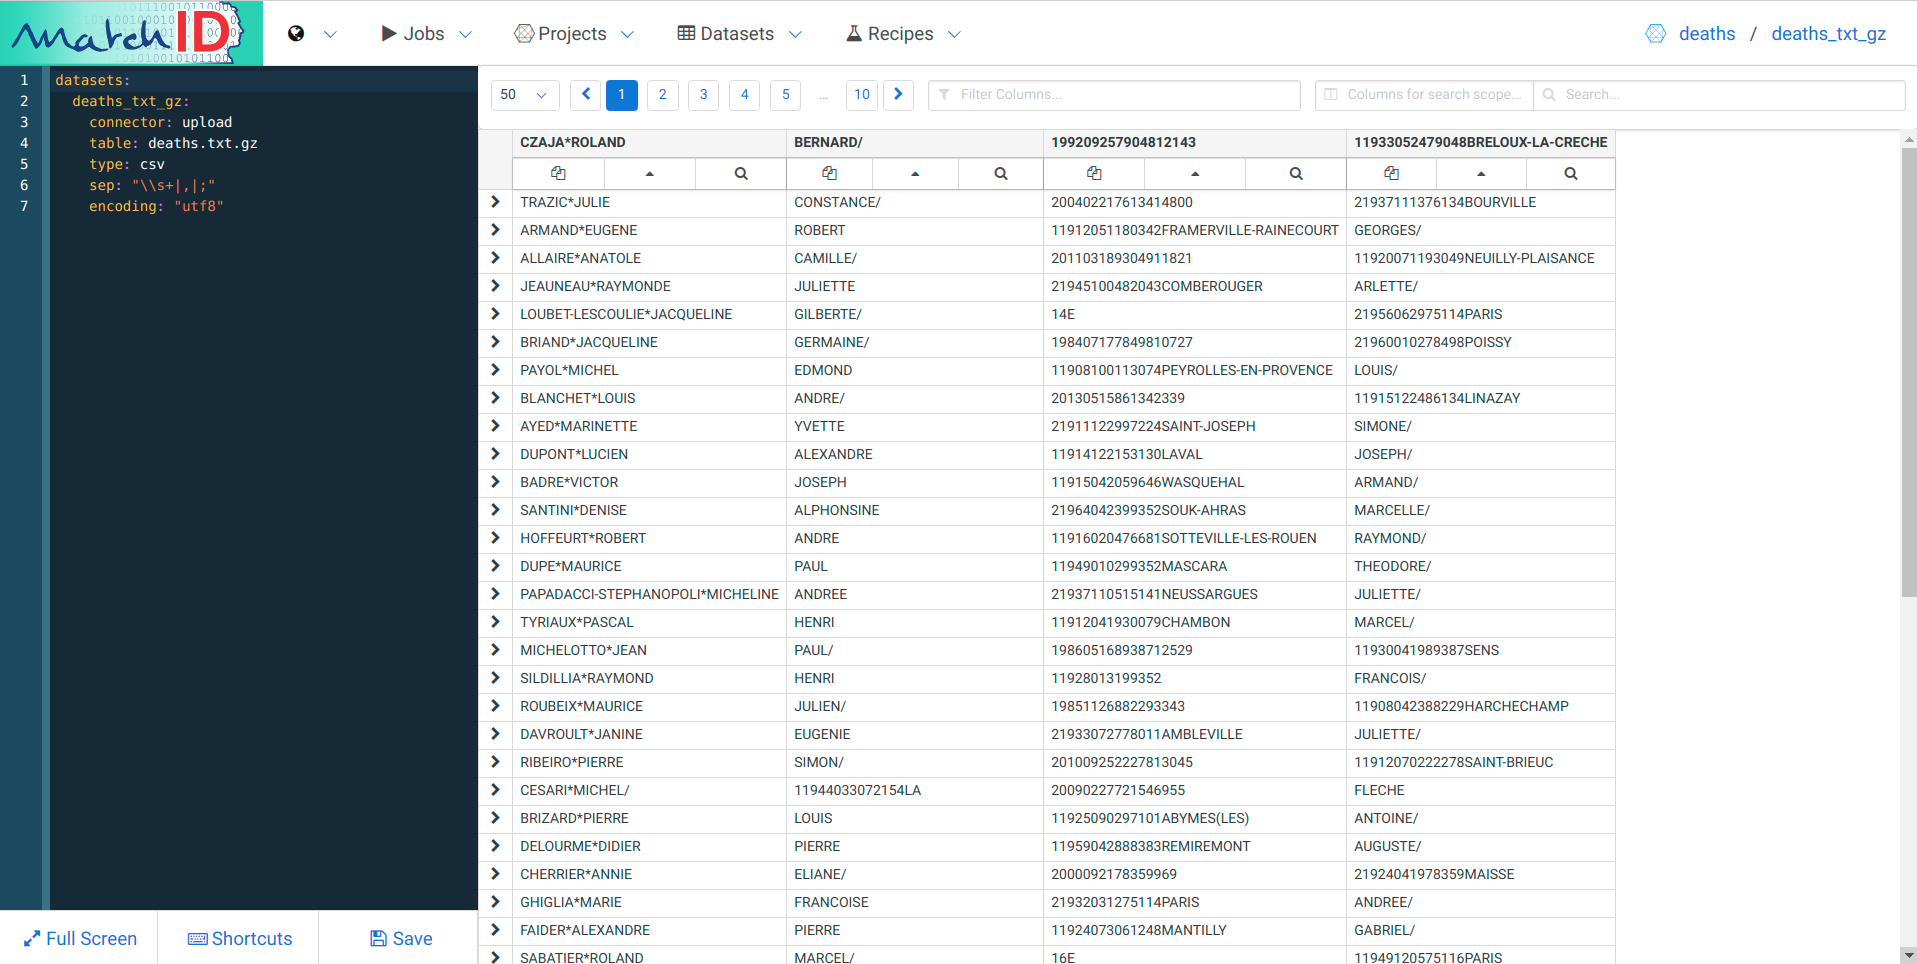
Take a look in a terminal of your gzipped fwf data :
$ zcat death.txt.gz | head -5
CZAJA*ROLAND BERNARD/                                                           11933052479048BRELOUX-LA-CRECHE                                           199209257904812143
TRAZIC*JULIE CONSTANCE/                                                         21937111376134BOURVILLE                                                   200402217613414800
ARMAND*EUGENE ROBERT GEORGES/                                                   11912051180342FRAMERVILLE-RAINECOURT                                      20130406803429904
ALLAIRE*ANATOLE CAMILLE/                                                        11920071193049NEUILLY-PLAISANCE                                           201103189304911821
JEAUNEAU*RAYMONDE JULIETTE ARLETTE/                                             21945100482043COMBEROUGER                                                 201105208204312208
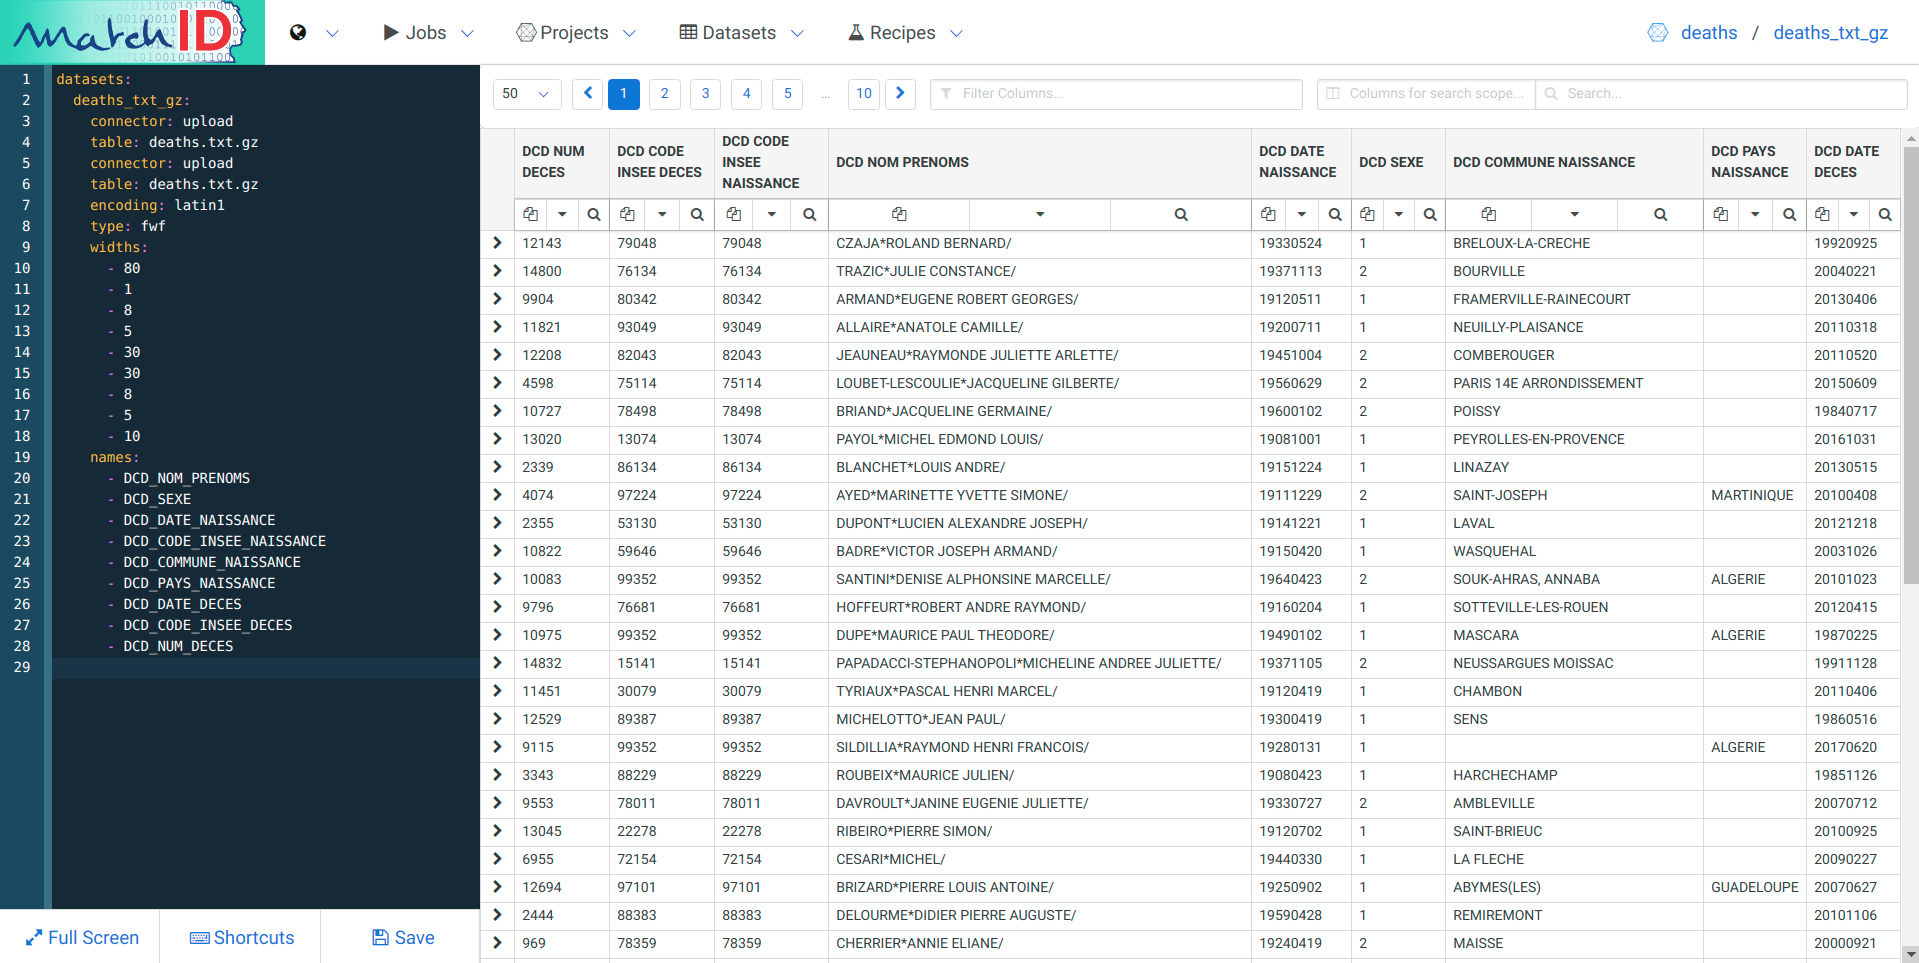
Well, it’s quite boring to decrypt it so… Here is the solution, just copy-paste it on the left pane where you have the dataset yaml code (each important line is commented) :
datasets:
  deaths_txt_gz:
    connector: upload             # the filesystem connector name, where drag'n dropped files are put
    table: deaths.txt.gz          # filename - could be a regex if multiple files
    encoding: latin1              # the encoding of the file, often utf8 for recent files
    type: fwf                     # type of the file : could be csv (tabular text), fwf (fixed with) or hdf5 (binary format)
    widths:                       # widths of the successive columns, as it is a fwf
      - 80
      - 1
      - 8
      - 5
      - 30
      - 30
      - 8
      - 5
      - 10
    names:                       # names of the successive columns, that you can customize
      - DCD_NOM_PRENOMS
      - DCD_SEXE
      - DCD_DATE_NAISSANCE
      - DCD_CODE_INSEE_NAISSANCE
      - DCD_COMMUNE_NAISSANCE
      - DCD_PAYS_NAISSANCE
      - DCD_DATE_DECES
      - DCD_CODE_INSEE_DECES
      - DCD_NUM_DECES
Then you can save that with Ctrl+S or the Save button.
Warning : mind any change you make to your code. Any change is definitive, and you may loose your code if you change the two first lines of the yaml code.
if you’re lost you can go to the tutorial follder and delete or change files manually. You can even rm -rf tutorial/projects/deaths and give a new birth to your project
Here you are:
Create a new recipe :
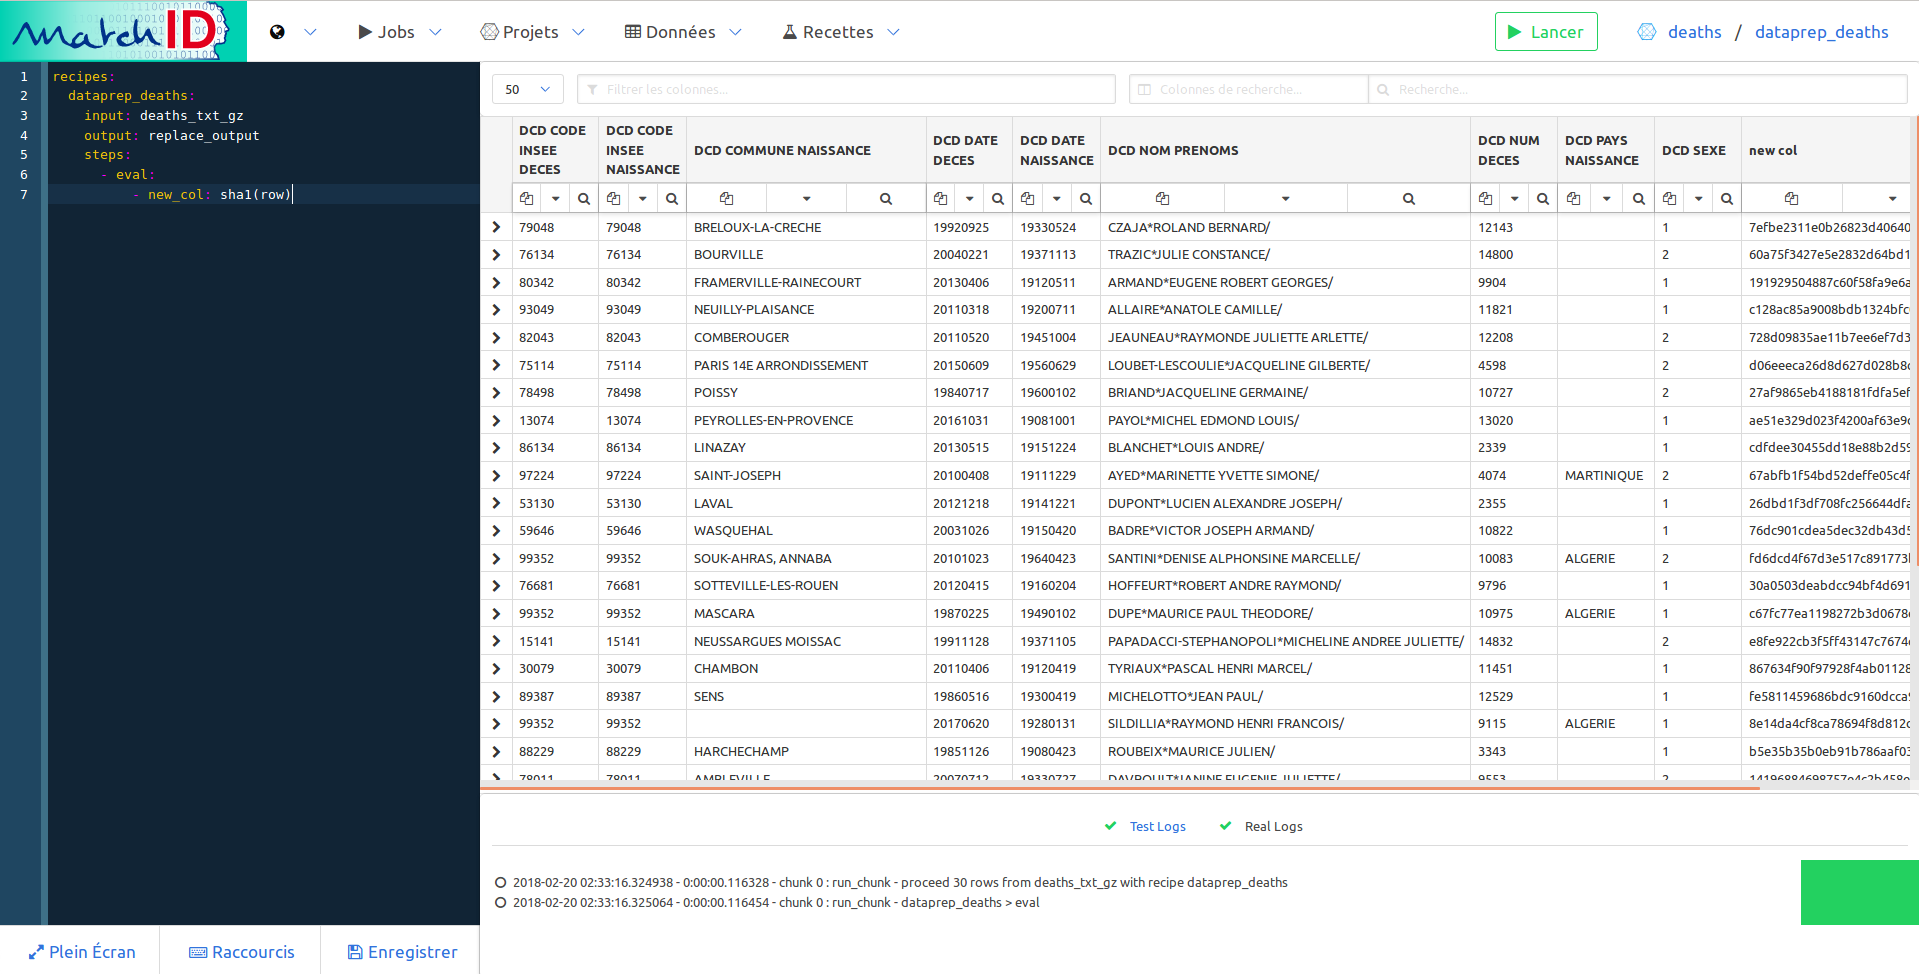
A default recipe is created with no valid dataset, just replace it with the uploaded dataset, deaths_txt_gz - as this can be done now, we already figure out we have a deaths dataset we’ll configure after finishing the recipe.
recipes:
  dataprep_deaths:
    input: deaths_txt_gz      # <==== necessary to change to continue
                              # there are advanced usage of dataset, such as filtered dataset
                              # which can be useful especially if you want more representative data
                              # for example:
                              # input:
                              #   dataset: deaths_txt_gz
                              #   filter: filtering_recipe # where filtering_recipe could be for example a random filtering
    output: deaths            # to be configured after the recipe
    test_chunk_size: 100      # optional : by default, the data display is only a chunk of 30 rows;
                              # the more you get, the longer you'll wait, but more data will me more representative for building the recipe
    threads: 3                # optional, default: 2 - numbers of threads to proceed when running the recipe (not applied while testing)
    steps:                    # this is the beginning of the recipe
      - eval:
          - new_col: sha1(row)
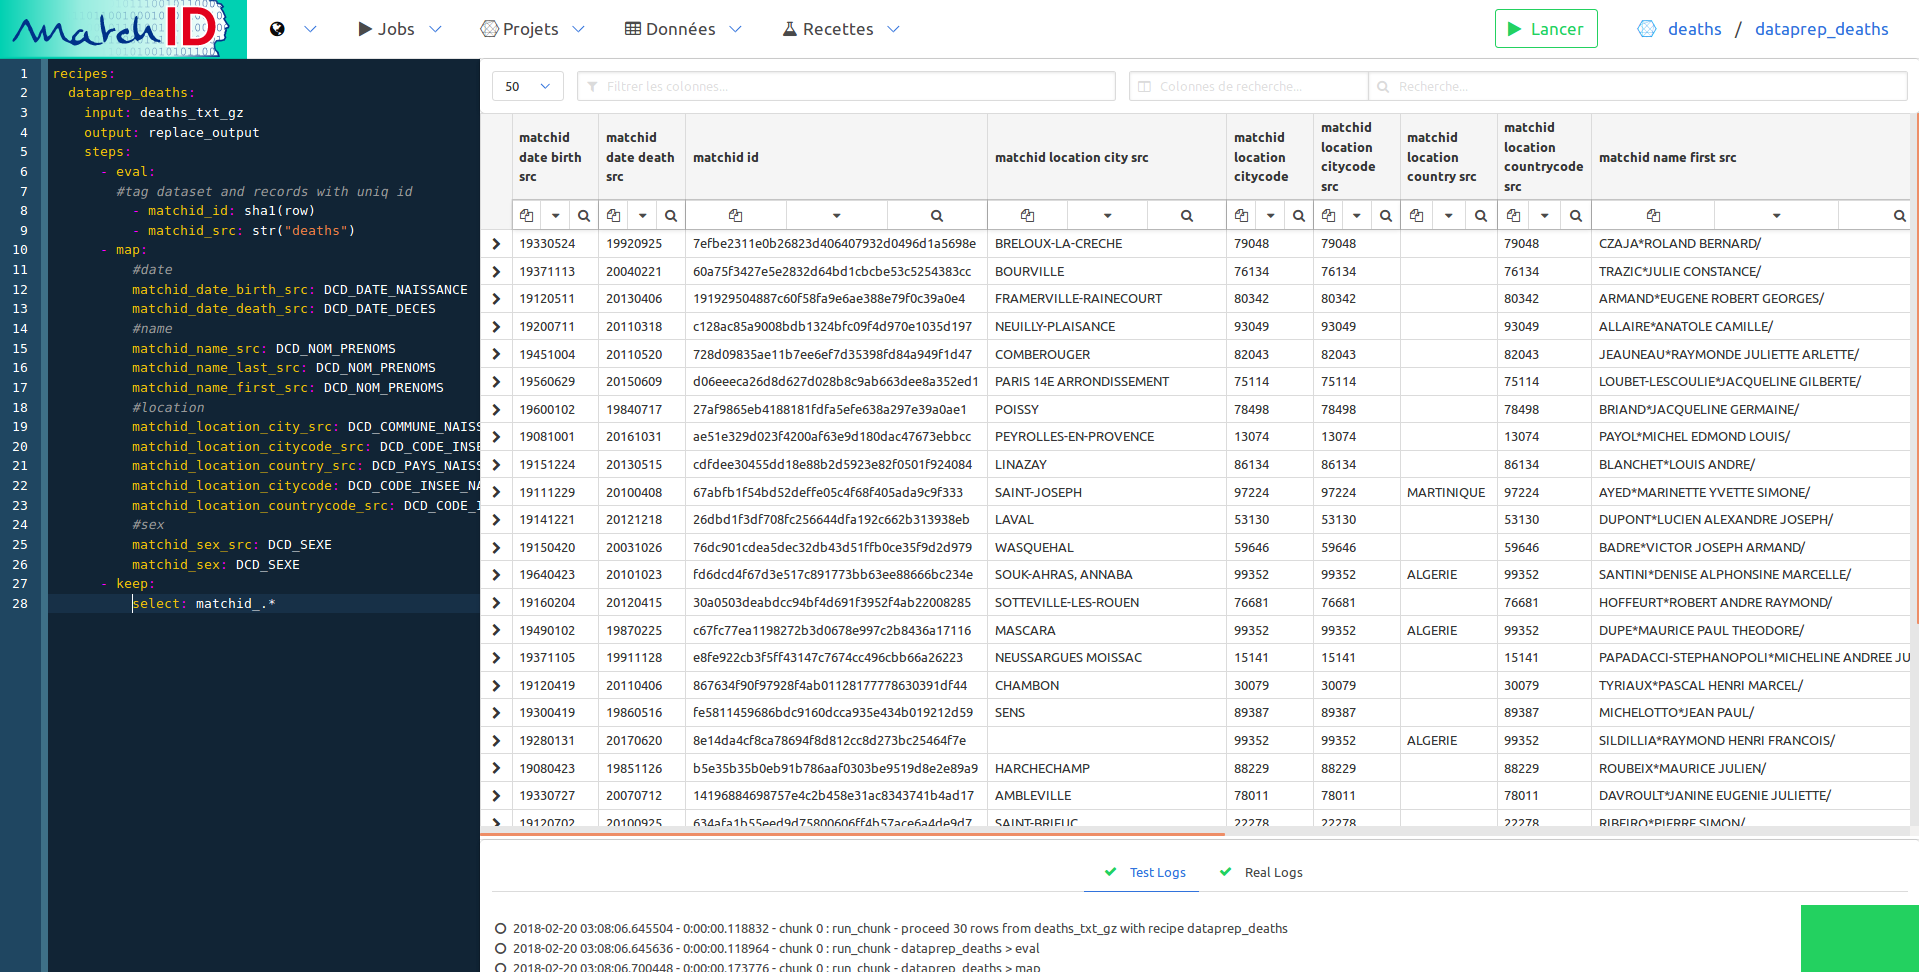
Save it (Save button or Ctrl+S), it should display the first imported dataset, but with an additionnal column, new_col which is basically a hash of the row:
So now you have an interactive way to deal with your data. Every new step of the recipe will add a new transformation on your data. You can have the exhaustive list of recipes here.
We’ll stay here in editing our first recipe, dataprep_deaths.
Our goal is to make our data matchable to another dataset, and this requires normalization. We’ll do that in four steps:
When joining large French names datasets, we showed that only about 33% of matches are perfect matches with no difference on any bit, 66% are fitting with a little tolerance (removing special characters, keeping the first first name), and you reach more than 90% of matching (recall) with a more accurate normalization (such as identifying the real birth city).
So we add the following steps (removing the new_col one) :
      - eval:
        #tag dataset and records with uniq id
          - matchid_id: sha1(row)
          - matchid_src: str("deaths")
      - map: # create columns with normalized names
             # the names are quite strict, to enable easy filtering and reuse of recipes
             # you are free to change the whole process, which a bit of method and patience
          #date
          matchid_date_birth_src: DCD_DATE_NAISSANCE
          matchid_date_death_src: DCD_DATE_DECES
          #name
          matchid_name_src: DCD_NOM_PRENOMS
          matchid_name_last_src: DCD_NOM_PRENOMS
          matchid_name_first_src: DCD_NOM_PRENOMS
          #location
          matchid_location_city_src: DCD_COMMUNE_NAISSANCE
          matchid_location_citycode_src: DCD_CODE_INSEE_NAISSANCE
          matchid_location_country_src: DCD_PAYS_NAISSANCE
          matchid_location_citycode: DCD_CODE_INSEE_NAISSANCE
          matchid_location_countrycode_src: DCD_CODE_INSEE_NAISSANCE
          #sex
          matchid_sex_src: DCD_SEXE
          matchid_sex: DCD_SEXE
      - keep: # remove old columns
          select: matchid_.*
Just filter the names setting matchid_name in the column filter. This filter uses regex so you can use complex filtering for easy navigation in your data:
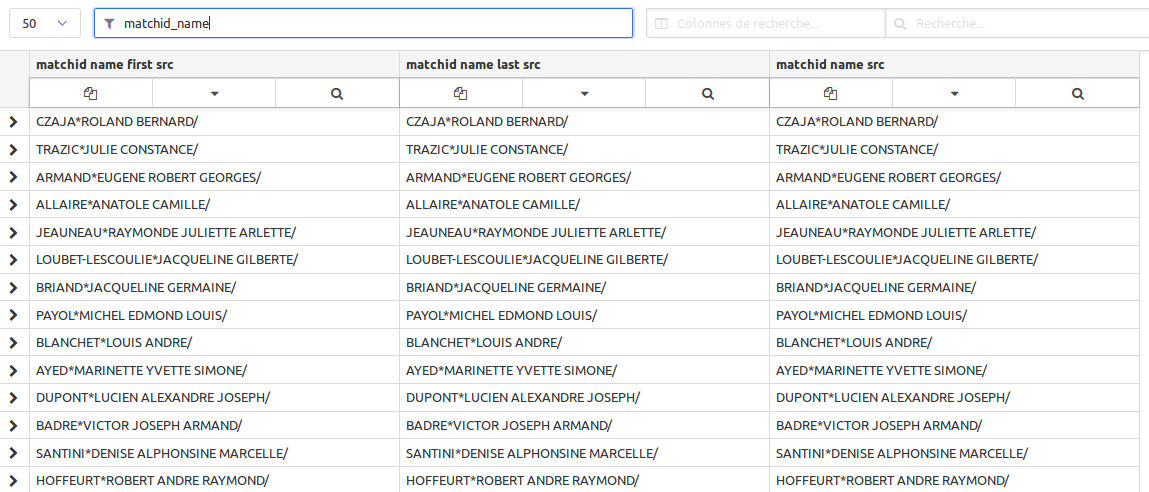
Now you see the names won’t match with this format which is quite special. We propose those normalizations. Just paste and save it step by step.
      #name
      - replace: # parses the last name with a regex
          select: matchid_name_last_src$
          regex:
            - ^(.*)\*.*/$: '\1'
      - replace: # parses the first name with another regex
          select: matchid_name_first_src$
          regex:
            - ^.*\*(.*)/$: '\1'
      - eval: # builds an array from the names
          - matchid_name_first_src: matchid_name_first_src.split(" ")
      - french_name_normalize: # applies standard normalization, removings accents, special chars, bringing to lower case
      - french_name_frequency: # uses names frequencies to join compound names
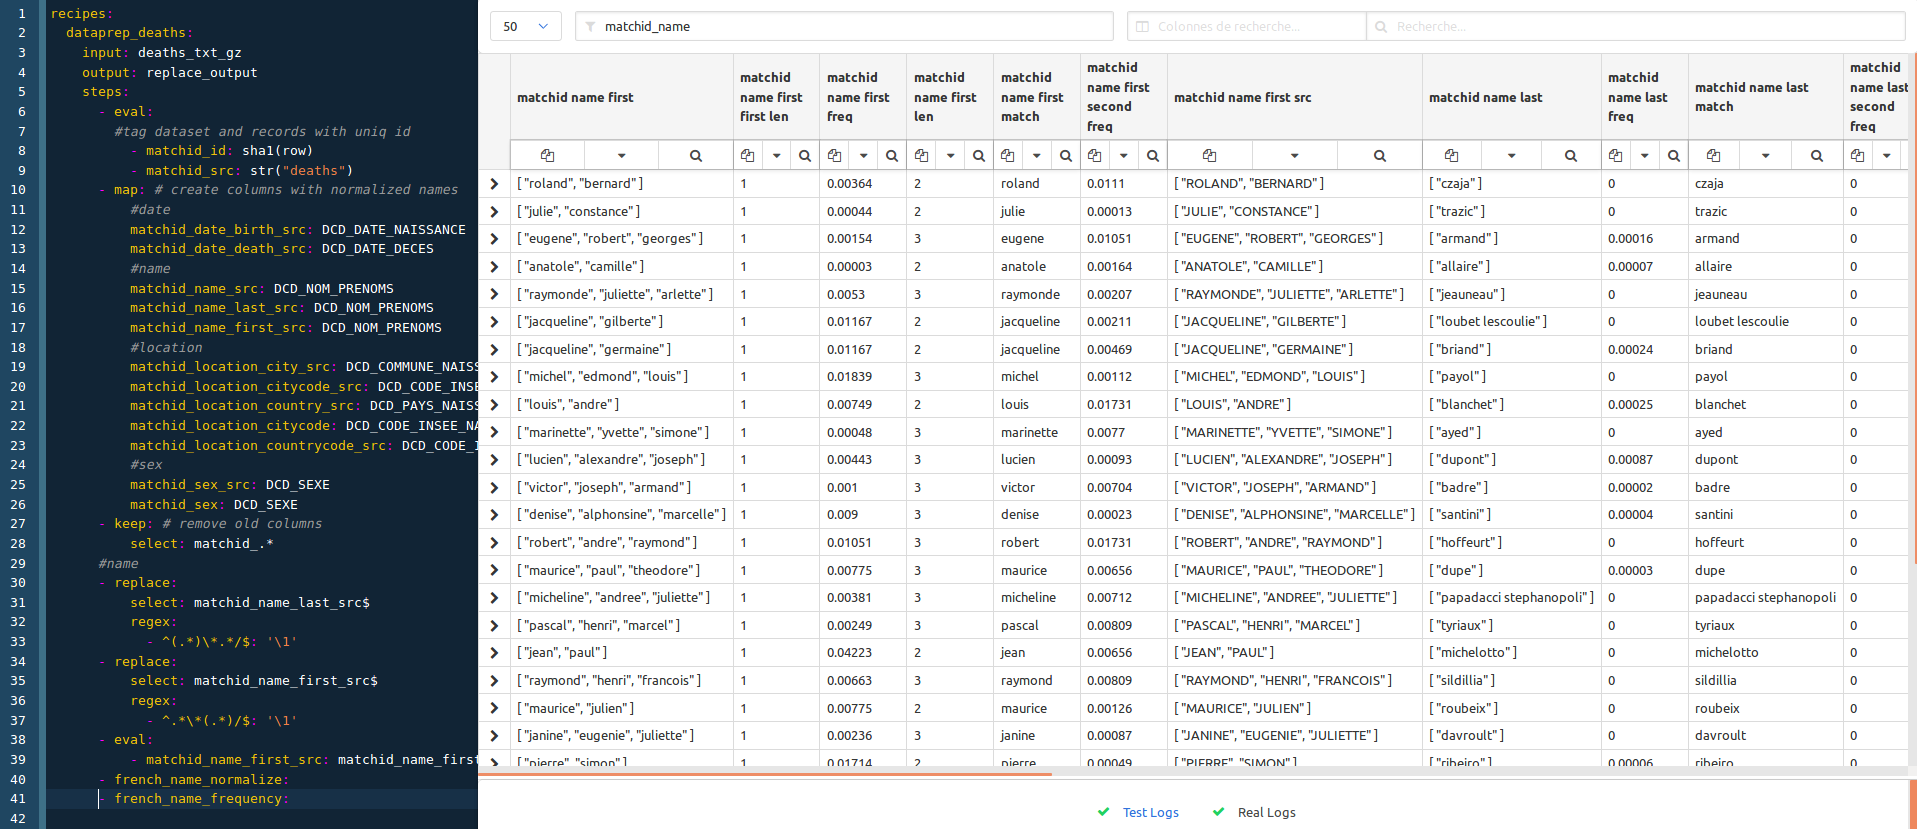
Note that both french_name_normalize and french_name_frequency recipes are available in the conf project.
If you just want to see the process at one step without deleting the following ones, you just have to use the ‘pause’ recipe :
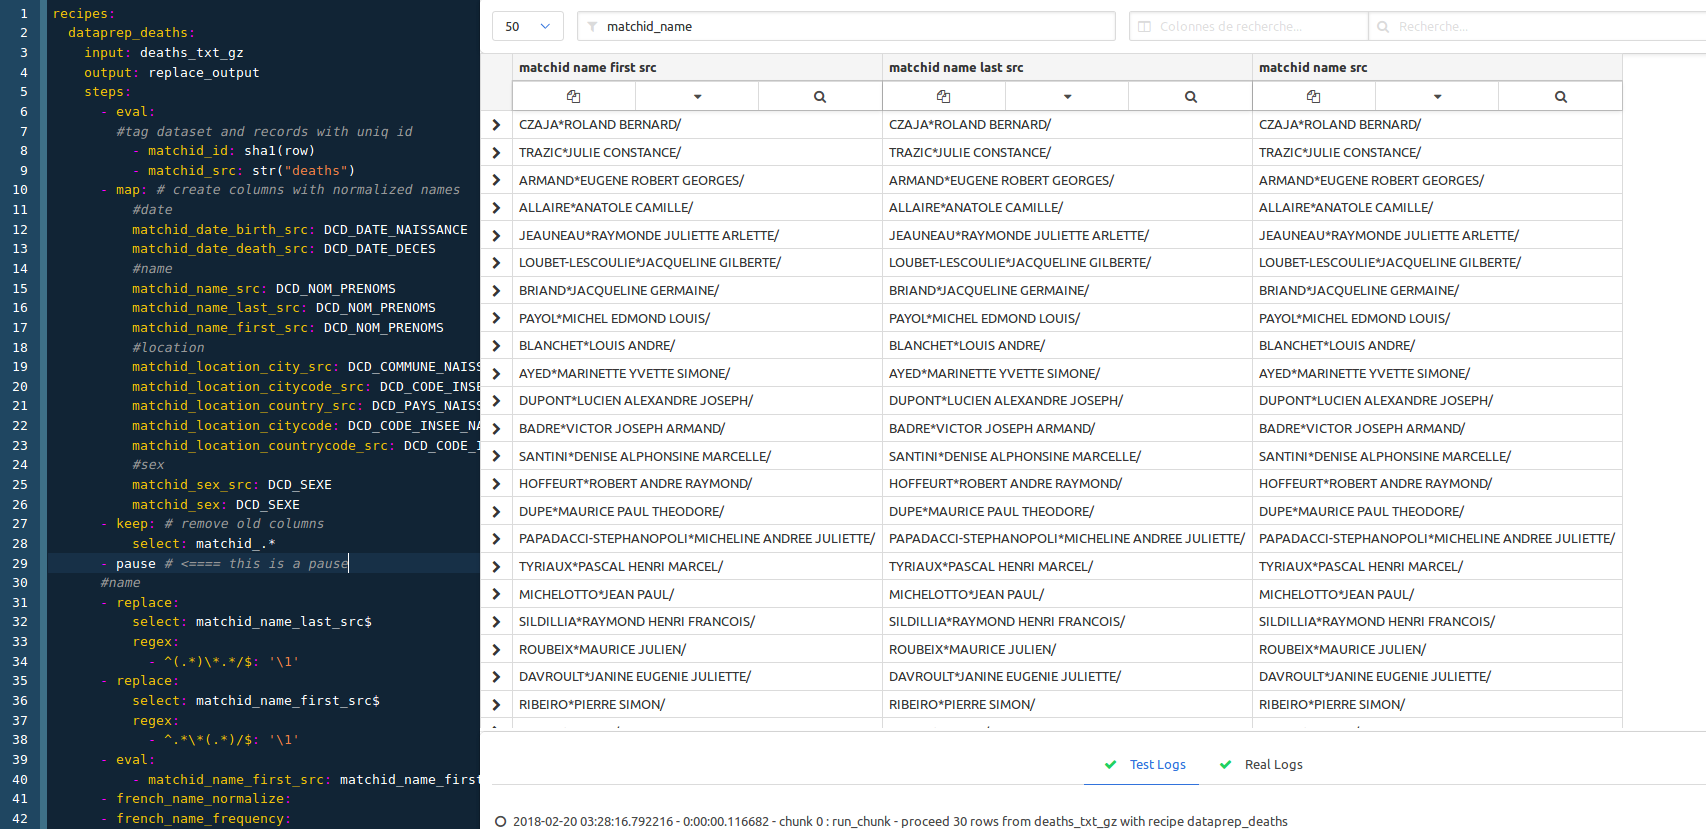
In this case we just put the pause step before the name normalization section. We remove it then to have the whole process.
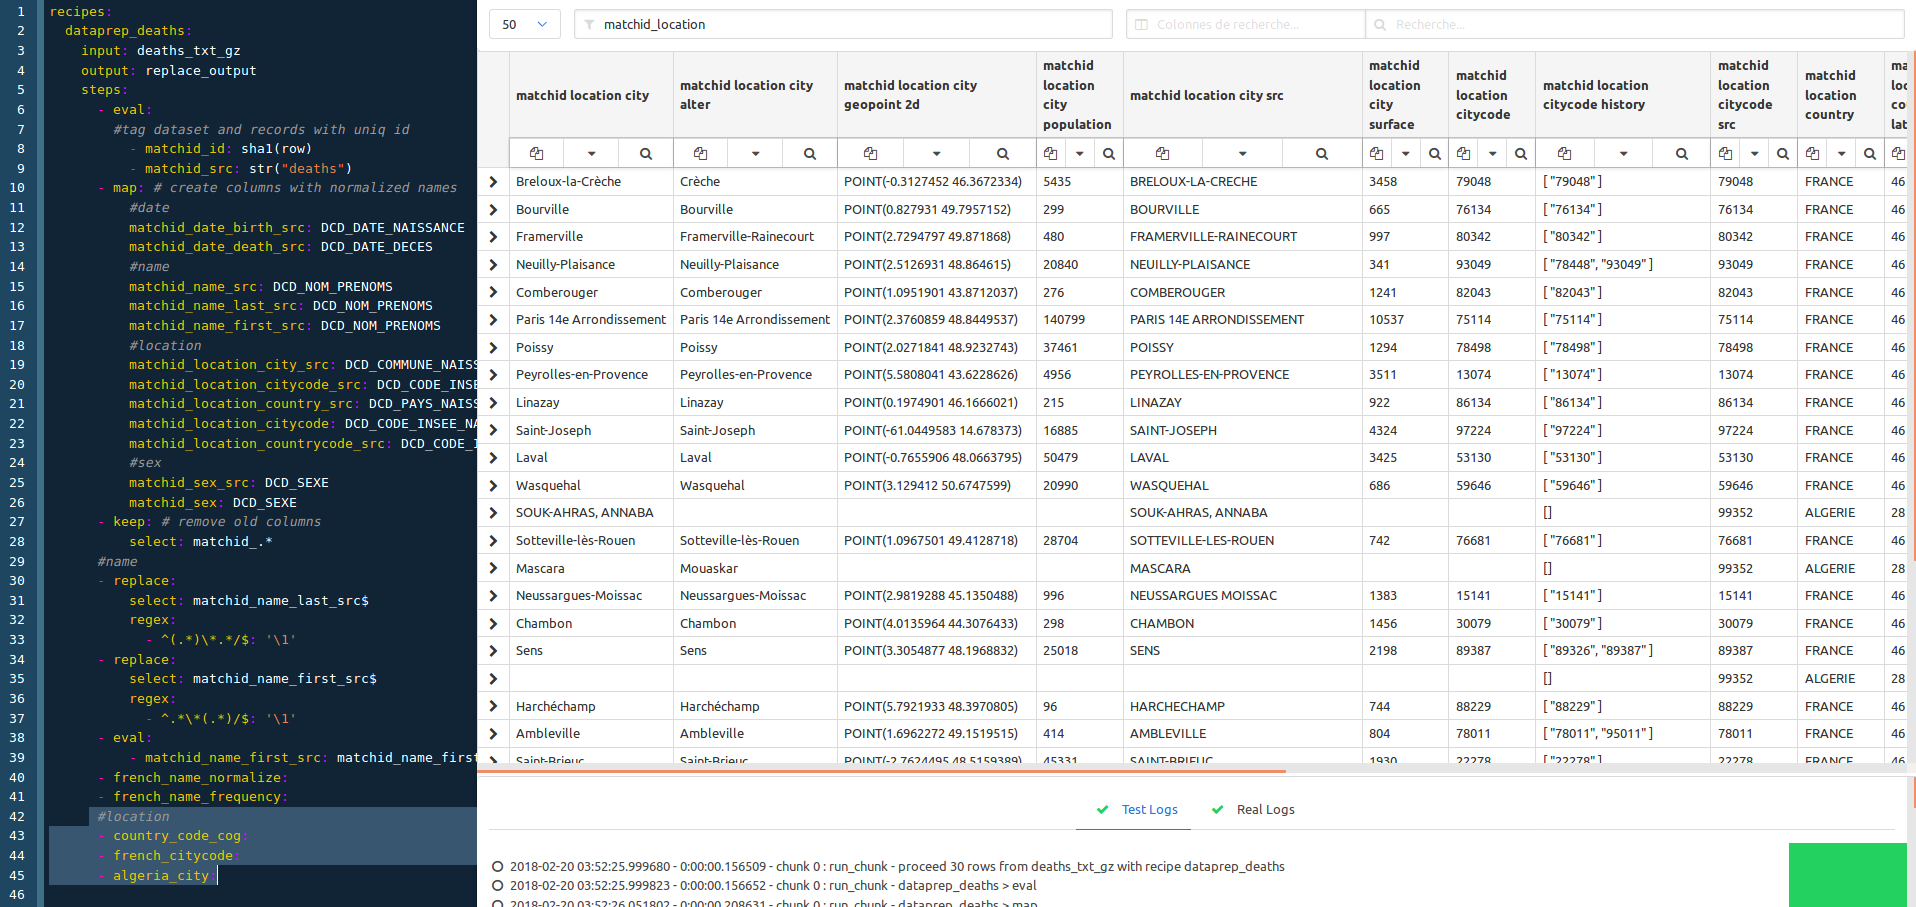
We now apply the column filtering on matchid_location to work on city names normalization. The goal is to make each location reliable, so we use external INSEE dataset (COG) to achieve this. This means that this treatment is focused on the French population.
      #location
      - country_code_cog: # expand countries against INSEE code
      - french_citycode:  # adds city code history and normalize name (works on 99,9% as based on INSEE code)
      - algeria_city:     # experimental, which is the second-order country of birth for France residents (~ 5 to 8%)
                          # works only on 60% of the cases as the referential is less reliable than the INSEE one
All the recipes are coded in the conf project so you can open them to have more details.
The French history codes are very important, as among the history city names changed a lot, and especially birth location of old people. So the name may have changed depending of the reference file. This treatment bring about 15% to 30% bonus in matching, and has to be performed on both datasets to be matched.
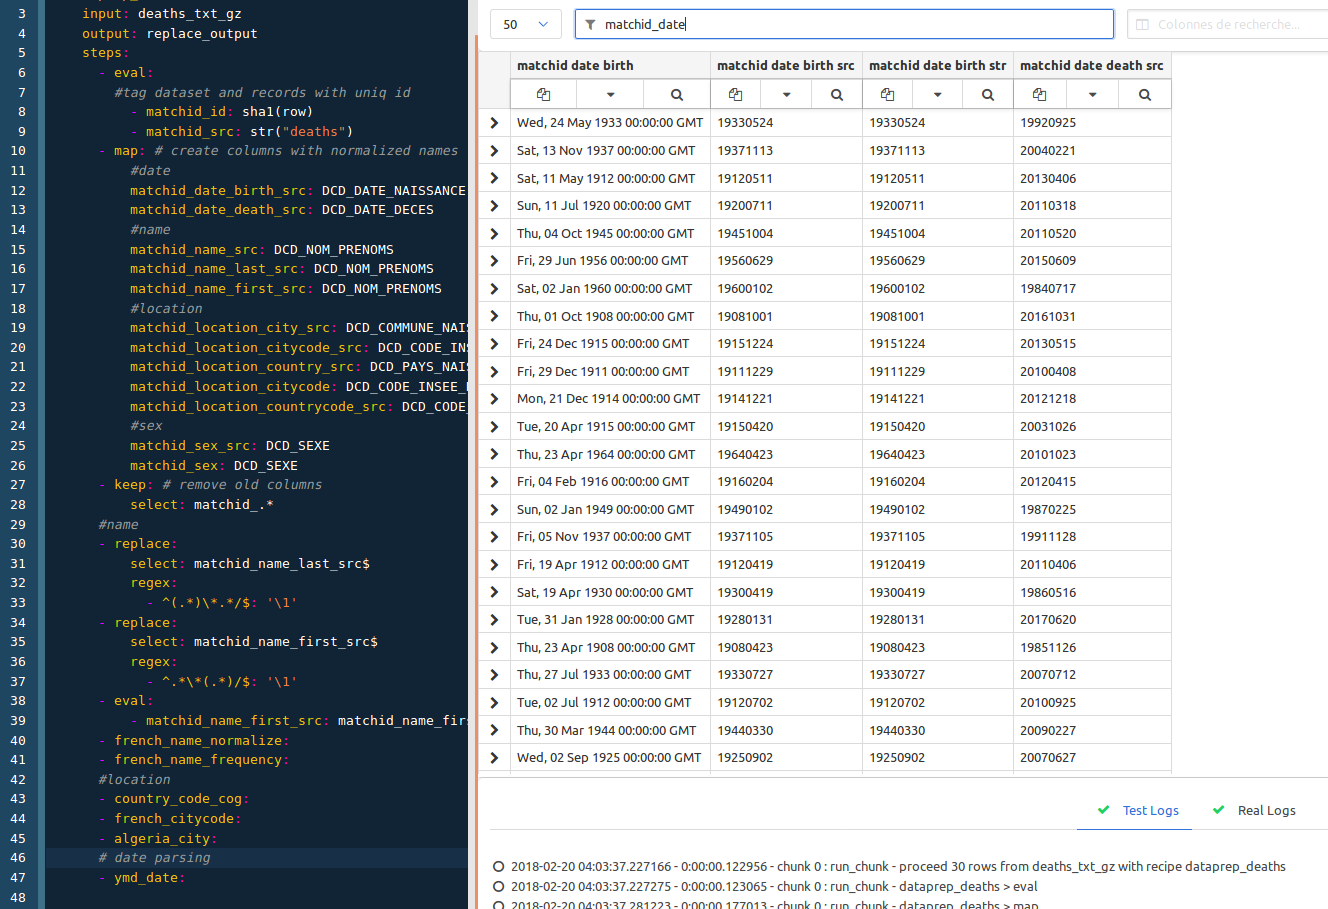
This is the easier part, it just consists in parsing dates, so with columns filtering to matchid_date, and just adding :
    # dates
      - ymd_date: # parses dates in year month day format (19580123)
ymd_date is, again, available in the conf project.
So this is the final preview :
Don’t forget to save your recipe. We’ll then create the deaths dataset as formerly pointed as the output dataset of the recipe. Just create it from the menu and paste this content :
datasets:
  deaths:
    connector: elasticsearch # this is the predeclared connector to the dockerized elasticsearch
    table: deaths            # name of the index
Note that you can configure many options for an elasticsearch dataset :
body: raw elasticsearch configuration contains all options such as mappings, the number of replicas and shards, tokenizers as in the elasticsearch documentation. You just have to convert your json mappings into yaml.chunks, thread_count, timeout̀, max_tries, safe for elasticsearch optimization.So once everything is configured, you can run the recipe with the green button :

This run is needed to index the deaths with elasticearch, which will enable a match of up to 98% (recall).
You can follow the job either directly in the bottom in the “Real logs”:

Or choose to see the “jobs” in the menu:

This should take about 30 minutes on a reasonable big computer (35 min using 10 threads = 10vCPU).
The job log last line should summarize the time and bugs for the recipe :
2018-02-20 05:31:45.788016 - 0:35:00.826869 - end : run - Recipe dataprep_deaths finished with errors on 46 chunks (i.e. max 92000 errors out of 1355745) - 1355745 lines written
If you take a look a the detailed logs, you’ll the that the bugs are only mix encoding problems, due to a badly formatted file. There aren’t 92000 errors, but only 46 encoding errors included in 46 chunks of 2000 rows. For now, the automation doesn’t scrutate as deep as you’d like, you’ll have to take a look by yourselves in the logs.
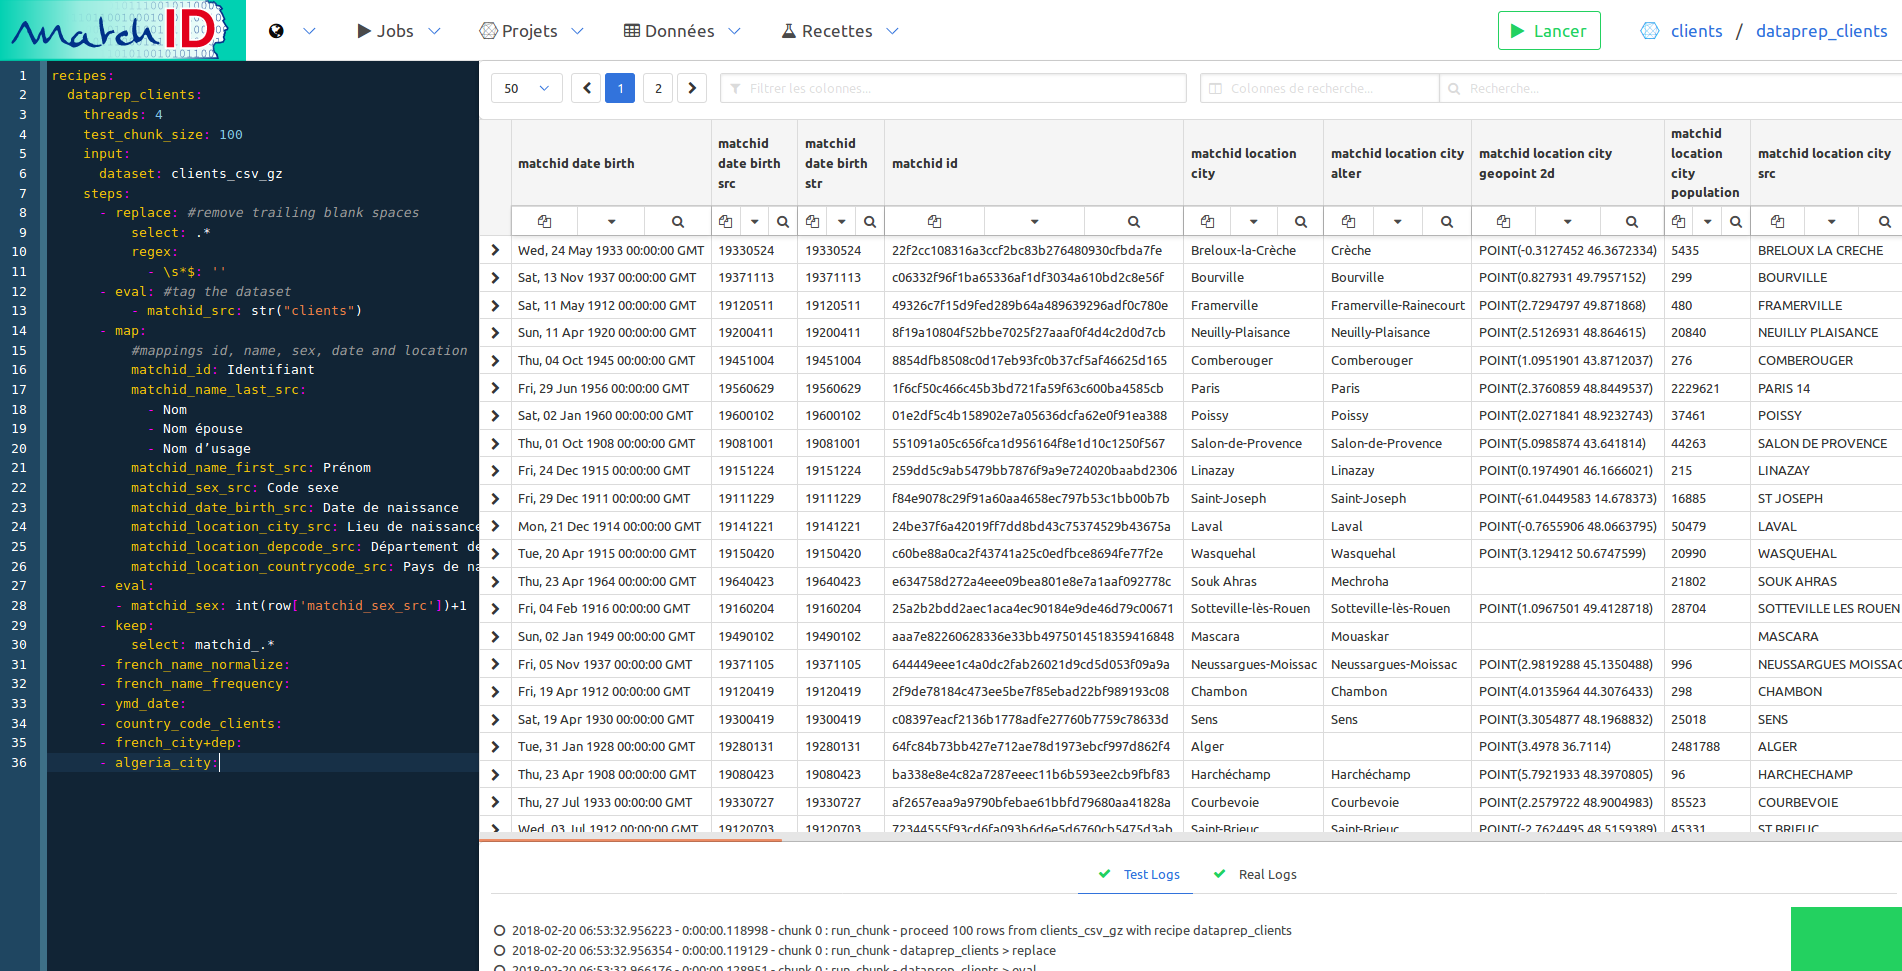
You should be able to follow the former steps on the new file, clients.
First create the project: clients.
Then import two datasets :
clients.csv.gzclients_pays.csv (custom country mapping corresponding to client.csv.gz).The data declaration helps can be found in:
You’ll need a custom recipe for preparation of country codes :
Then you’ll be able to prepare the clients data :
Mind that the datasets in the matchID example project don’t exactly have the same names : so you’ll have to change them, which should lead you to deal with the debug interface.
Note that the preparation differs only a few from the deaths.txt.gz file :
You should quickly have this final view of dataprep :
We won’t have to run this one.
Here comes the tricky part : the fuzzy match with elasticsearch. What kind of matching do you need ? This first step uses indexation to maximize recall while narrowing the huge cardinality of matching millions of records to millions of records, leading to a reasonable bucket to score, hoping begin less than 10th the size of the smaller dataset. Three kind of indexation can be done :
The first two lead to huge buckets and search will be a bit more precise.
So, now you have to match every client against the already-indexed-in-step-1 deaths.
to be modified : begin with a simple elasticsearch request instead of the hard one
First create a generic deaths_matching in the death project from deaths_matching.yml. This one performs a self match from deaths to deaths, this isn’t the aim here.
This recipe essentially contains a complex elasticsearch query, translated from json to yaml and templated. Here’s the explanation of the query.
Many specificities of your dataset would lead you to customize the search query : should you have poor data with no birth date, or would you have wife names, the query has to match your custom need.
All those conditions make a large recall without bringing too much candidates.
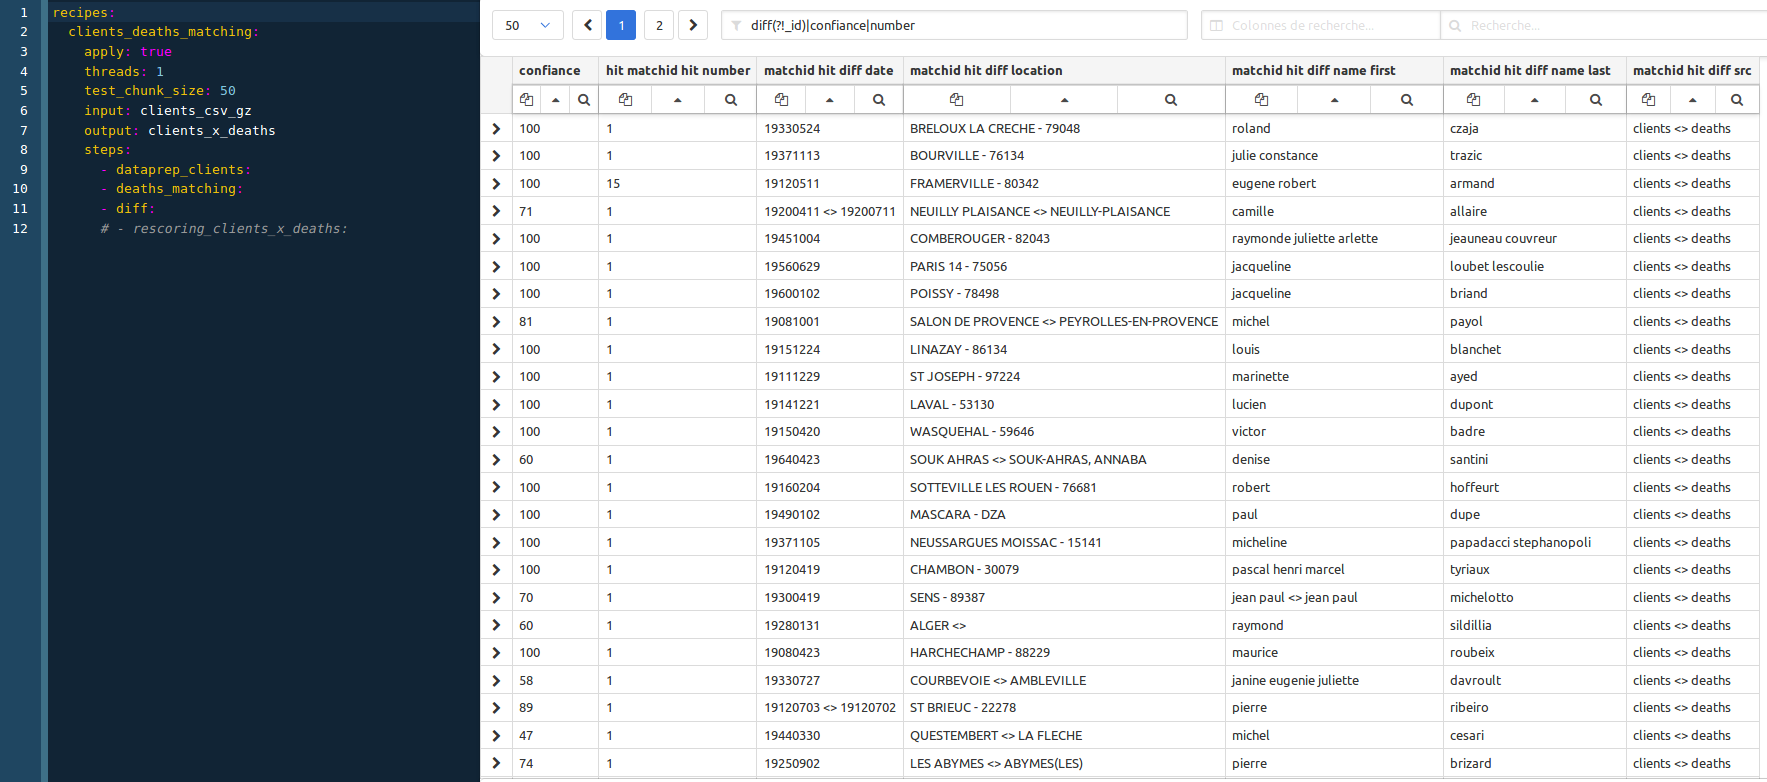
Now we create a combo recipe, clients_deaths_matching in the clients project, calling the last two ones, plus a special one, diff :
recipes:
  clients_deaths_matching:
    apply: true
    threads: 1
    test_chunk_size: 50
    input: clients_csv_gz
    output: clients_x_deaths
    steps:
      - dataprep_clients:
      - deaths_matching:
      - diff:
then you should have your first sampling results (screenshot obtain using a regex filter: diff(?!_id)|confiance|number):
Before running these recipes, don’t forger to create the client_x_deaths dataset in elasticsearch :
datasets:
  clients_x_deaths:
    connector: elasticsearch
    table: clients_x_deaths
    validation: true        # <=== this is mandatory to go to step 3
Run the recipe. It should take about 2 hours to run it for 1M x 1M with a 16vCPUx32Go and 3 elasticsearch nodes.
You don’t have to wait the full run to examinate your matching results : go to the client_x_deaths dataset.
The validation: true option activates this button :

Click on it to access to the validation mode, which enables the possibility to annotate your results :

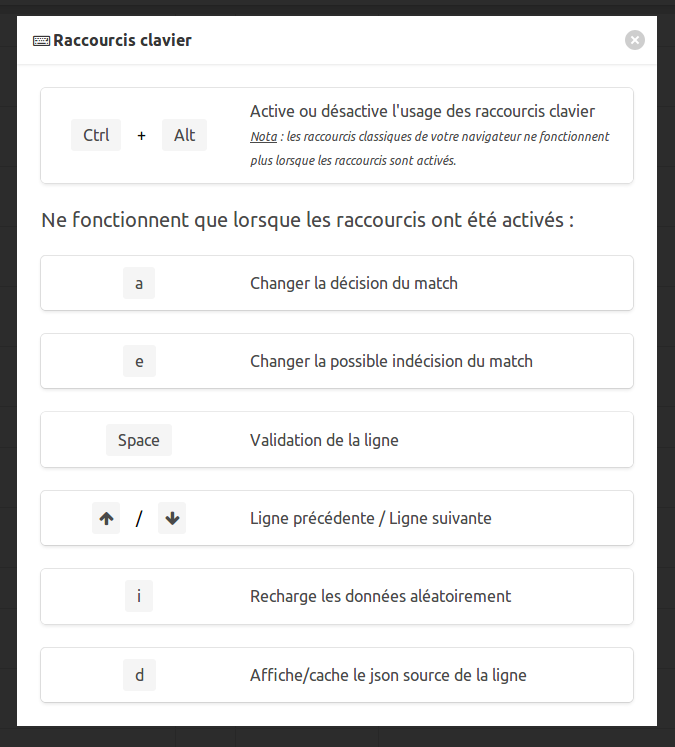
The cheat codes page (keyboard icon) will help you understand how to annotate :
You now have two new goals
If you’re a data scientist you will skip this section, as of course a scientific method is your job.
If have no idea about evaluation : evaluation is a very important thing.
We had a huge chance while building the first algorithms of matchID : we had a target dataset of about 27k people which were already annotated as dead in the file we had to clean. This target had no major statistical bias and we could mesure a maximum recall of 97.5% with the elasticsearch levenshtein 2 method, whereas a pure SQL method lead as to a not so bad 92%. But a maximum 97.5% of recall only means a point of equality to 95% (recall = precision) and to a 90% recall = 99,8% precision. All those mesures were taken on the use case of matching dead people as declared by INSEE in the French driving licence file. As we apply matchID, with various adaptations, on many use cases, we can say that performance is not an absolute thing, widely depends on the quality of your files and on your business case. So : an evaluation has to be driven on a reasonable (huge enough) amount of data to be serious.
Performance of a matching should not be measured in a mono-dimensional score. Two factors have to be considered : precision and recall - or false alarm rate / true positive rate - which lead to ROC curves. Only this second method can be evaluated when you have no idea where your missed targets are (which is often the case if you have to use matchID).
Another method for evaluation is the cost-loss method, which helps you choose the right threshold for your business.
Those methods are not helped for now in matchID and has to be planned in a further evolution of the frontend.
For now, you will have to take care about the amount of data you annotate (don’t talk about a 99.99 precision if you didn’t annotate at least 20.000 data without an error). You will have to take care about the representativity of your annotations too. matchID helps you in that way as the validation selects random data to annotate when you click on the reload button.
You have to follow this representativity a graph button to display some statistics :
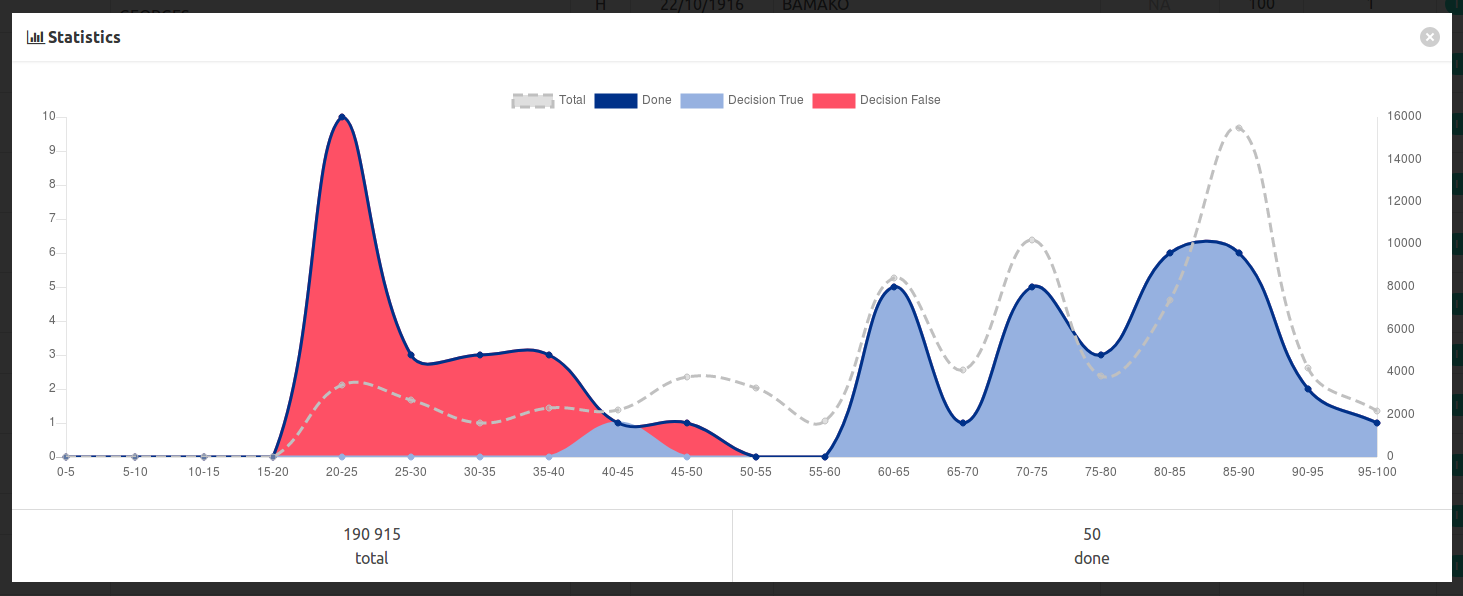
In this example, we annotated a bit too much easy messy data with low scores, and too few middle range scores, which are often the hardest to annotate.
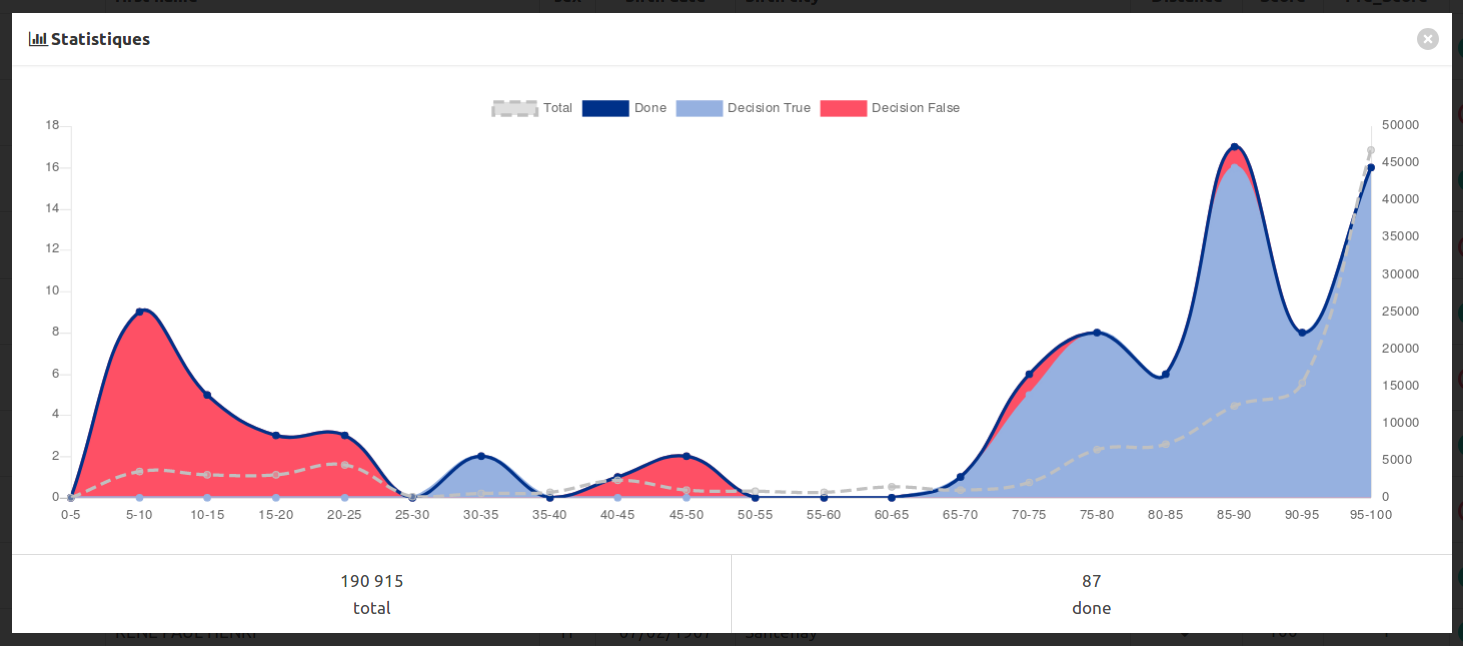
With the data published in the matchID project, which are basically anonymized crossable dataset, we miss some representativity on the middle range scores, revealing the artificiality of our sampling. You’ll see too many cases of undecidable things.
Evaluation is one goal: having better scores is another one.
So this is now we imply machine learning. One thing to remember : if you’re a bad teacher, your machine will be a dunce ! And: you first have to be a great teacher and annotate much data to be rewarded by machine learning.
Identity matching annotation is not an easy thing and depends on your context and aims. Your decision will be influenced by your goal, but to be a good teacher you should focus on what kind of influence each one of your annotation will lead as a generalization. For example : taking a decision without all the context (e.g. with missing data) will be better if you practice backoff, i.e. your rely on the most probable decision given the data you see. If you think your annotation could bring a bias, it is better not to take a decision.
In the first times you’ll have many situation which will seem you undecidable. For this reason we added a additive annotation (possible indecision), which may help you to come back to decide later. The more you annotate data the more you’ll have your own modelisation of the data. The more you have people to annotate the smoother will be the annotation dataset. But everyone is not designed to be a teacher: every annotator has to be stable and patient, and should want to learn by himself what the data is for real (and should be greedy of annotating !).
In this case, the machine will be trained to recognize a false hit against a true hit with your annotated data. The only thing the machine will be able to learn are numerical data which are a bit more than 20 features :
So here is the recipe, train_rescoring_model:
recipes:
  train_rescoring_model:
    test_chunk_size: 10000      # <==== should not be necessary (warning: use to workaround a bug while writing the doc)
    input:
      dataset: clients_x_deaths
      chunked: False            # <==== this is for telling to get the whole data (warning: bug while writing the doc)
      select:                   # <==== this is a filtering query to load only annotated data from the dataset
        query:
          constant_score:
            filter:
              exists:
                field:
                  validation_done

    steps:
      - build_model:
          model:
            name: clients_deaths_ml        # <==== model name
            method: RandomForestRegressor  # <==== we tested all algorithms with our R&D lab with Dataiku/DSS
            parameters:                    #       and didn't test other scikit learn model, as RandomForest
              n_estimators: 20             #       performed always well in this kind of use case
              max_depth: 4                 #       you can play with some parameters, but keep in mind that
              min_samples_leaf: 5          #       the better optimization will be to provide more data, so
            tries: 3                       #       annotate !
            test_size: 0.33                #       2/3 for training, 1/3 for testing, then we choose the best
                                           #       regressor
          numerical: .*(hit_score_(?!ml).*|population|surface|matchid_hit_distance)$
                                           #       numerical factors as described above in the text
          #categorical: .*(matchid_location_countrycode)$
                                           #       categories have not been tested yet
          target: validation_decision      #       the target is your annotation
                                           #       the indecision is not taken into account there
When you save the recipe, you can see the performance of your machine learning model in the log :

In this not serious annotation of only 92 matches, the second model does have a perfect score. Every time you save, the algorithm trains again, and you can see how stable it is. If you have no stability at all, you should annotate more data.
If stable enough, then run the recipe, this will save the model which will be reusable.
We can now apply the previously built model to apply a better scoring on the matches :
recipes:
  rescoring:
    input: clients_x_deaths
    output:
      dataset: clients_x_deaths
      mode: update              # <=== don't forget this field, otherwise your matching data and annotations could be lost !
    steps:
      - apply_model:
          name: clients_deaths_ml
          numerical: .*(hit_score_(?!ml).*|population|surface|matchid_hit_distance)$
                                # the numerical factor must be exactly the same as in the training, otherwise the model
                                # won't apply
          target: matchid_hit_score_ml
      - eval:
          - confiance: >
              try:
                cell = round(0.7*float(matchid_hit_score_ml)+30*float(matchid_hit_score))
              except:
                try:
                  cell = matchid_hit_score_ml
                except:
                  cell = matchid_hit_score
          - scoring_version: str("{}-randomforest-{}").format(re.sub("-.*","",scoring_version),str(datetime.datetime.now()))
As machine learning can drift, we keep in the recipe 30% of the initial scoring to avoid complete change on full positive or full negative matches.
You can immediately run this recipe which will just update the confiance column and versioning. This is a quick step, and should be over in about 15 minutes.
Then you can go check again the validation of clients_x_deaths to check the impact on the discrimation :
You can annotate again concentrating on new middle range scores, training again, and so on…
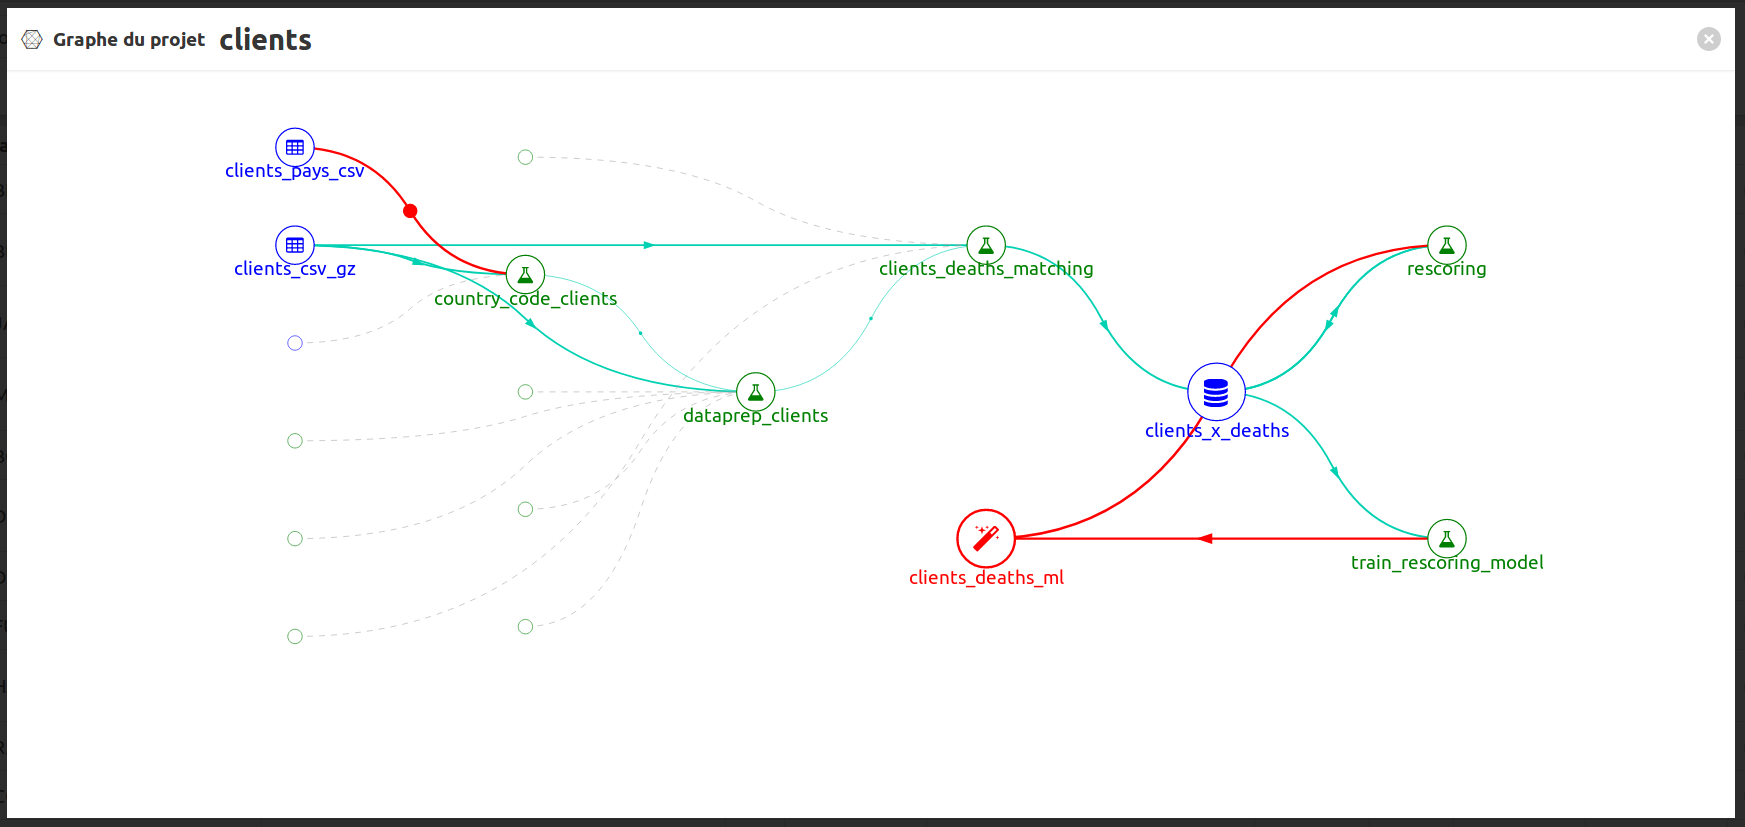
To have an overview on the global process you can click on to open the graph project:
Fabien est ingénieur et travaillait au sein de ministères régaliens sur la data et l'IA. Concepteur de matchID et de deces.matchid.io, il développe toujours avec plaisir les algorithmes aussi bien que les UI, sur son temps libre. Il a quitté depuis peu l'administration française, et reste passionné par les projets d'intérêt général.

Cristian est phD passionné de développement et technologie, expert en deeplearning. Il travaille aujourd'hui au ministère de l'Intérieur, où il a créé IA Flash, et contribue activement à matchID avec la création de l'API décès.

Martin est ingénieur et cofondateur de CommoPrices.com, la plus grosse plateforme de prix de matières premières he world biggest portal of commodity prices. Il a développé l'interface de validation de matchID pendant son challenge EIG.